Hole by hole guide by our PGA Club Professional
After the short walk past the front of the impressive clubhouse you reach the opening hole…
Hole 1 - Bayford View
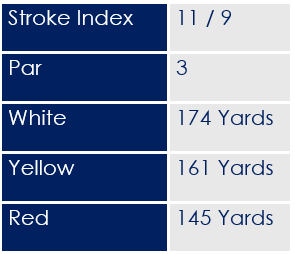
Bayford View is so-called because of the fine view of Bayford from the tee box.
This testing opening par five requires a certain amount of bravery as out-of-bounds runs all the way down the right-hand side, and your second shot is blind. Once negotiated, the green awaits invitingly at the base of the hill. For an interactive 3D scan of the hole CLICK HERE.
.
Hole 2 - Blackfan Rise
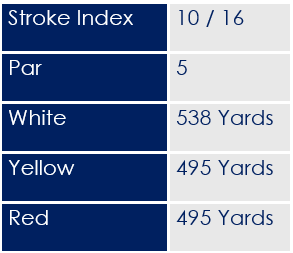
Blackfan Rise – named after Blackfan Wood, runs from the clubhouse to Bayford.
This 339-yard hole has a sloping fairway from left to right down towards a stream that meanders along the length of the hole, so a tee shot down the left-hand side is the ideal line. The approach is uphill and plays longer than the yardage. The green slopes from back to front, so exercise caution on your way back if you finish past the hole. For an interactive 3D scan of the hole CLICK HERE.
.
Hole 3 - Fanshaws
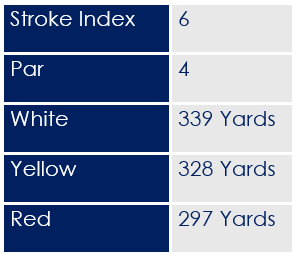
Fanshaws – named after a nearby Victorian mansion house.
Although one of the shorter par 4’s on the course at just over 300 yards, the difficulty lies in the green, which slopes from front to back and right to left. Many a 3 putt here! For an interactive 3D scan of the hole CLICK HERE.
.
Hole 4 - The Rookery
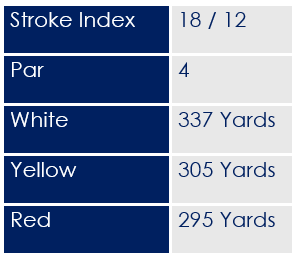
The Rookery – a Rookery used to be situated to the right of the 4th fairway.
It is an uphill par 4 that plays longer than 452 yards from the back tee. The smart golfer will play it as a par 5 and hope for a putt to drop on the two-tiered green. For an interactive 3D scan of the hole CLICK HERE.
.
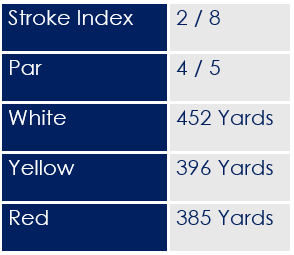
Hole 5 - Captain's Drive
Captain’s Drive – tee box used by both Men & Lady Captains for their inaugural drive.
This testing dog leg to the right requires an accurate tee shot to set up a view of the narrow, well-guarded green with water awaiting the miss-hit approach and out-of-bounds left. For an interactive 3D scan of the hole CLICK HERE.
.
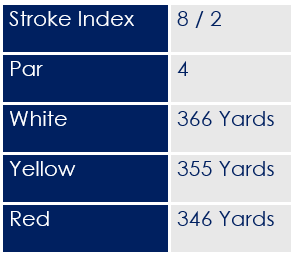
Hole 6 - The Tower
The Tower – the Gothic conical tower of the house is in the background on this hole.
The first and friendliest of the par 3’s has two cross bunkers 30 yards short, distorting the distance, but a nice straight hit over these should set you up for a good chance of a par. For an interactive 3D scan of the hole CLICK HERE.
.
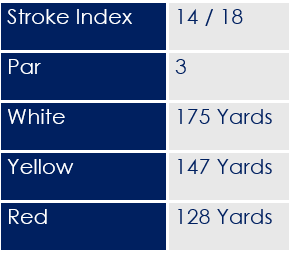
7th Hole
Nobles Fade is in recognition of Leslie Noble, who initiated the purchase of the Estate and establishment of the Golf course in the 1960s.
A second dog leg to the right is again all about the position to set up your approach shot. Big hitters attempt to cut the corner by driving over the huge trees to set up a short pitch to the green, but for most of us mere mortals, aiming for the marker post is the wisest move, which may leave a 150-yard approach to the green. For an interactive 3D scan of the hole CLICK HERE.
.
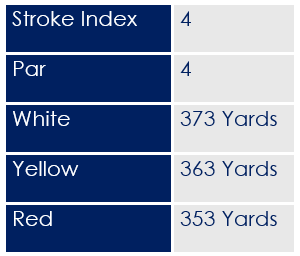
Hole 8 - Crook
Crook – in recognition of Richard (Dick) Crook, who was a key figure in establishing the club.
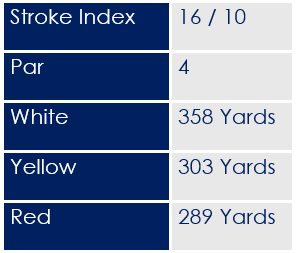
At 358 yards off the back tee, this dogleg from right to left around a pond can interfere with your tee shot or approach. A well-placed drive sets up a good view of one of the course’s flatter putting surfaces. For an interactive 3D scan of the hole CLICK HERE.
.
Hole 9 - Juniper
Juniper – a 100-year-old, rare specimen of Syrian Juniper tree was positioned to the right of the hole. Unfortunately, it fell at the turn of the century.
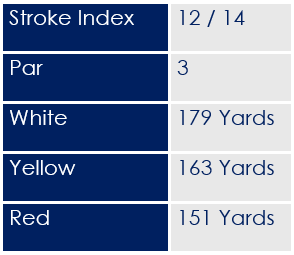
This is a challenging par 3. The narrow entrance to the green is surrounded by bunkers left and right. The undulating green requires a delicate touch to complete the front nine. For an interactive 3D scan of the hole CLICK HERE.
.
Hole 10 - Firs Dip
Firs Dip – conifers line the fairway on the left.
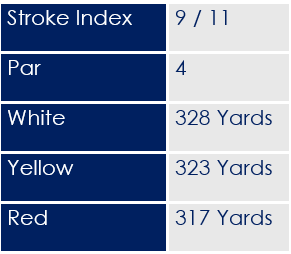
This 328-yard par 4 is an inviting start to the back nine. Play across the dip and over the hill, and a large, slightly raised green awaits. For an interactive 3D scan of the hole CLICK HERE.
.
Hole 11 - Moorhens
Moorhens – the birds that often congregate in the pond to the left of the green.
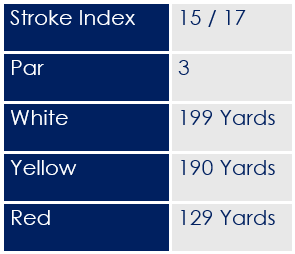
At 199 yards from the back tee, this is the longest of the par 3s. The cross bunkers not only catch the miss-hit shot but also create the illusion that the hole is shorter than it looks. Once over the bunkers, the ball is free to run onto the green, which is protected on both sides by grassy hollows. For an interactive 3D scan of the hole CLICK HERE.
.
Hole 12 - Cottons Choice
Cottons Choice – course architect C.K. Cotton chose this hole as his favourite.
At 427 yards, this par 4 has a generous fairway, with bunkers further down the hole on the right than on the left. A long, accurate approach is required, as the ball can be swept away on the left side of the green. A tiny shelf on the back right side of the green is a popular pin position for the club’s big events! For an interactive 3D scan of the hole CLICK HERE.
.
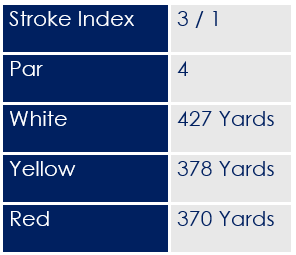
Hole 13 - Lang Whang
Lang Whang—meaning “big whack”—is in honour of Scotsman Dennis Hagan, the 1986 Club Captain, who instigated the naming of the holes.
The first par 5 on the back nine requires some thought, after negotiating the narrow tree lined fairway the hole opens out to present a trio of bunkers that cross the fairway diagonally. It’s a risk-and-reward moment: lay up short, leaving a long approach shot, or take on the bunkers to leave a shorter shot into the green. For an interactive 3D scan of the hole CLICK HERE.
.
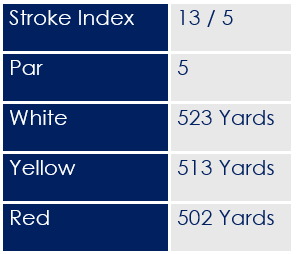
Hole 14 - White Stubbs
White Stubbs – named after White Stubbs Lane that runs parallel to the hole.
A generous-looking fairway guarded only by two fairway bunkers on the right-hand side that may catch the sliced tee shot. The approach needs pinpoint accuracy, as your ball can easily run off this upturned saucer of a green, leaving a tricky chip or, worse still, a pond awaits to the left of the green. For an interactive 3D scan of the hole CLICK HERE.
.
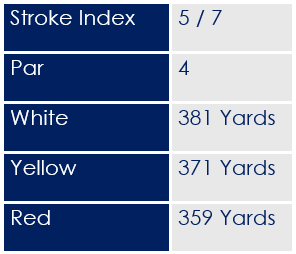
Hole 15 - High Tee
High Tee – this tee is positioned at the course’s highest point.
An inviting view down the hill from the tee encourages you to attack this par 5, measuring just under 500 yards. Many view this hole as the quiet before the storm, as the last three holes present a challenging finish but not before negotiating the treacherous undulating green. For an interactive 3D scan of the hole CLICK HERE.
.
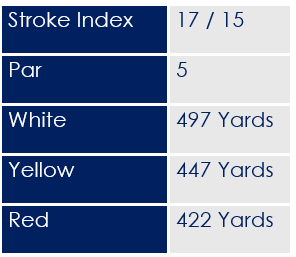
Hole 16 - Aldenham
Aldenham – named after Lord Aldenham, the club’s first president.
This is a long, uphill par 4 that turns gently to the left, favouring the big hitters. Once near the raised green, an accurate approach is required to set up any chance of success. For an interactive 3D scan of the hole CLICK HERE.
.
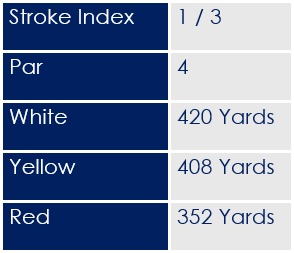
Hole 17 - Ace of Herts
Ace of Herts – voted as the UK’s best amateur golf hole in 2016 & 2017
Named for its beauty and difficulty, this hole is not for the faint-hearted. (It was Voted “Best Amateur Golf Hole in Great Britain” two years on the trot.) Negotiate the challenging tee shot with out-of-bounds all the way down the left-hand side, and you are faced with a stunning view of the green from the top of the hill. The fairway then sweeps towards a sizable pond before climbing back up the slope to the green cut into the landscape. For an interactive 3D scan of the hole CLICK HERE.
.
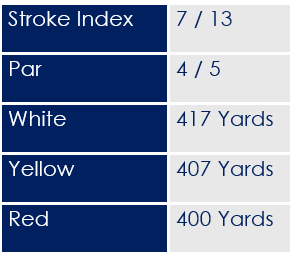
Hole 18 - The Grange
The Grange – a full view of the rear of the magnificent Grange from the tee.
An uphill par 3 provides a beautiful view of the newly developed clubhouse, but work must be done to finish your round on a high note. At least one more club will help you reach this large raised two-tier green, setting you up nicely for a visit to the 19th hole. For an interactive 3D scan of the hole CLICK HERE.
.
